VPS 인스턴스 생성후에 어떤작업을 가장 먼저 하나요?
전 우선순위중 fail2ban을 설치합니다. 이후에 서버 기본 방화벽을 활성화 하고 추가적으로, IPtables을 사용하거나, Clamav를 설치합니다. 또 가상호스트에는 GeoIP 및 보안관련 설정을 합니다. 일련의 이러한 작업은 서버를 좀 더 안전하게 지키는데 많은 도움이 됩니다.
워드프레스와 우커머스는 자동화된 해커봇에 의해 무의미한 공격을 지속해서 받기 쉽습니다.
이러한 공격은 시스템이 오버로드되거나, 서버의 속도를 느려지게 만들고 심하면, 다운될수 있습니다. (504게이트웨이 시간초과 또는 500 내부서버오류)
그래서 오늘은 Ubuntu 18.04, Nginx 1.16.1, WordPress 사용환경에서 Fail2ban을 설치하고 어떻게 작동이 되는지, 또 워드프레스 XMLRPC DDoS 공격으로 부터 보호하는 방법을 추가로 설정해 보겠습니다.
Table of Contents
Nginx 기본 DDoS 방어 설정
먼저 nginx 전역 환경설정 파일 nginx.conf 에서 limit_req_zone (단일 IP주소에서 들어오는 요청의 처리 속도를 제한하는 데 사용)을 http 블록안에 설정합니다.
limit_req_zone $binary_remote_addr zone=one:10m rate=1r/s;적용할 가상호스트 파일을 열고, 아래와 같이 별도의 로그기록과, xmrpc와 wp-login 요청 스탬프 기록을 위한 nginx 설정을 추가합니다. 설정변경후에는 nginx -t 로 문법오류검사와 nginx -s reload 로 설정을 다시 불러오기를 합니다. 아래 설정만으로는 DDoS 공격을 완화할뿐 강력한 공격에는 무리입니다.
access_log   /var/log/nginx/yourdomain.com.access.log;
error_log    /var/log/nginx/yourdomain.com.error.log;

location ~ (wp-login|xmlrpc)\.php {
	limit_req   zone=one  burst=1 nodelay;
	include fastcgi_params;
	fastcgi_pass unix:/var/run/php/php7.4-fpm.sock;
	fastcgi_param SCRIPT_FILENAME $document_root$fastcgi_script_name;
	limit_req_status 444;
}
Fail2ban 설치 및 환경설정 | Ubuntu 18.04
이제 fail2ban을 설치하고, wp-login.php 와 xmlrpc 을 보호하기 위해 Jail 필터를 구성해 봅니다.
apt-get update && apt-get upgrade -y
apt-get install fail2ban
/lib/systemd/systemd-sysv-install enable fail2bannginx-limit-req.conf, wordpress.conf 환경설정 필터 파일 만들기. [ 표현식 참조 ]
nano /etc/fail2ban/filter.d/nginx-limit-req.conf[Definition]
failregex = ^ \[error\] \d+#\d+: .*limiting requests.*, client: <HOST>, server: \S+, request: "POST /xmlrpc.php.*$
^ \[error\] \d+#\d+: .*limiting requests.*, client: <HOST>, server: \S+, request: .*$
ignoreregex = nano /etc/fail2ban/filter.d/wordpress.conf[Definition]
failregex = ^<HOST> .* "(GET|POST) /wp-login.php
^<HOST> .* "(GET|POST) /xmlrpc.php
필터 설정화일 정규식 실행 테스트
fail2ban-regex /var/log/nginx/yourdomain.com.error.log /etc/fail2ban/filter.d/nginx-limit-req.confjail 폴더 만들기
mkdir -p /etc/fail2ban/jail.dnginx-limit-req, WordPress jail 만들기
nano /etc/fail2ban/jail.d/nginx-limit-req.conf[nginx-limit-req]
enabled = true
filter = nginx-limit-req
port = http,https
logpath = /var/log/nginx/*error*.log
findtime = 60
bantime = 7200
maxretry = 3위 설정을 보면 필터를 활성화하고, 필터명 nginx-limit-req, 감시 포트는 80,443, 로그경로는 가상호스트 파일에 /var/log/nginx/yourdomain.com.error.log;로 설정 해놨기때문에 여러 가상호스트가 생성되더라도 패스를 참조할수 있게 했습니다. 규칙은 동일한 IP에서 1분동안 3번실패하면 7200초(2시간)동안 차단되게 됩니다. 차단시간이 음수(-1)일경우 영구 차단됩니다.
ignoreip = 127.0.0.1/8 192.168.0.0/24 와같이 추가적으로 화이트 IP를 지정할수 있습니다.
nano /etc/fail2ban/jail.d/wordpress.conf[wordpress]
enabled = true
port = http,https
filter = wordpress
action = iptables-multiport[name=wordpress, port="http,https", protocol=tcp]
logpath = /var/log/nginx/*access*.log
maxretry = 6
findtime = 86400
bantime = 72000워드프레스 접근제어까지 생성후,
만든 jail을 테스트 하고 에러가 없다면, 재시작 합니다. (경고문은 무시)
fail2ban-client -d
service fail2ban restart
nginx 가상호스트에는 아래와 같은 형식으로 로그기록을 변경한다.
access_log /var/log/nginx/yourdomain.com.access.log;
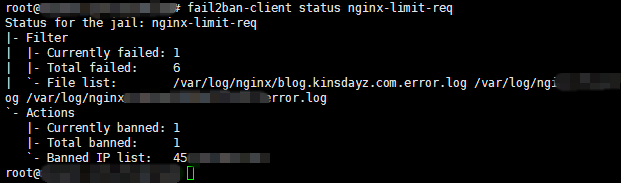
error_log /var/log/nginx/yourdomain.com.error.log;fail2ban 상태 확인, 규칙들을 봅니다. iptables 에서도 확인이 가능합니다.
fail2ban-client status nginx-limit-req
iptables -L -n
Fail2ban 작동확인 테스트해보기.
아파치 벤치마크툴로 wp-login 및 xmlrpc 에대해 테스트를 해보겠습니다. 먼저 아파치 벤치마크툴 설치는 아래와 같습니다.
apt-get install apache2-utils -y기본컨넥션 1개로 100개의 요청을 보냈습니다.
ab -n 100 -c 1 https://yourdomain.com/wp-login.php
ab -n 100 -c 1 https://yourdomain.com/xmlrpc.php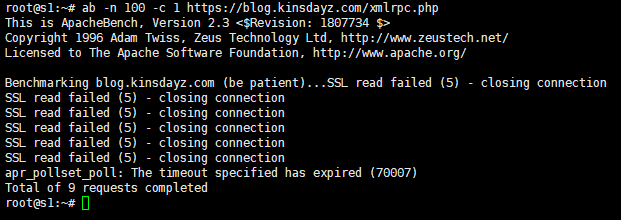
Baned IP 지우기
테스트한 내 서버IP를 지우거나, 원치않는IP가 있을경우 아래의 명령어로 간단히 IP 삭제가 가능합니다.
fail2ban-client set jail명 unbanip IP주소차단 IP 직접 로그 및 DB에서 확인해보기
fail2ban 로그파일 경로는 /var/log/fail2ban.log 에 저장된다. 로그로테이트 설정파일 경로는 /etc/logrotate.d 에 위치합니다. 로그에서 직접 확인은 아래의 명령어로 가능합니다.
cat /var/log/fail2ban.log | grep "] Ban" | awk '{print $NF}' | sort | uniq -c | sort -n차단IP들은 fail2ban의 sqlite3의 DB에 저장됩니다. 우분투에 기본설치 되어 있지 않으니, 확인시 설치가 필요합니다. dbfile 확인은 fail2ban-client get dbfile 명령어로 확인, 테이블 확인은 sqlite3 /var/lib/fail2ban/fail2ban.sqlite3 .table , sqlite3 /var/lib/fail2ban/fail2ban.sqlite3 .schema, 차단된IP 출력은 아래명령어로 가능합니다.
sqlite3 /var/lib/fail2ban/fail2ban.sqlite3 "select distinct ip from bans;"FAIL2BAN이 얼마나 많은 일은 하고 있는지 마지막으로 제가 사용중인 인스턴스중 sshd 상태를 보겠습니다.
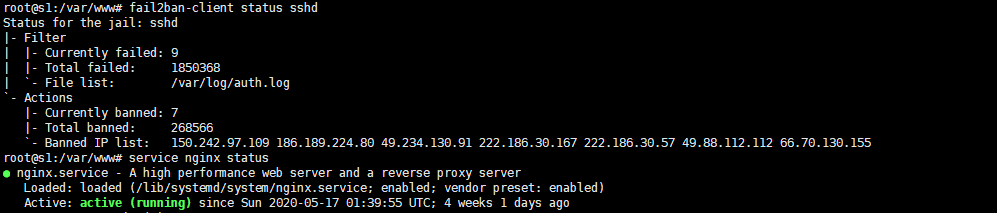
제 생각에는 fail2ban을 설치하지 않고 사용하시는분들은 드물겠지만, 혹시라도 설치를 하지 않았다면, 꼭 설치해서 안전하게 운영하길 바랍니다.