시작하기전에.. 실습환경을 준비해봅니다. 먼저 프록시 로드발랜싱으로 사용될 서버 1대, Was01, Was02 호스트 서버 2대 이렇게 준비가 되어 있어야 합니다.
결과만 보기때문에 자세한 옵션 설명은 최대한 하지 않았습니다. 그냥 복붙하여 IP, 호스트네임정도만 수정하면 됩니다.
프록시로 사용할 서버는 우분투18.04, Nginx 1.14.0, Was01은 우분투20.04, Nginx 1.18.0, Was02는 우분투 18.04, Nginx 1.16.1 입니다.
Table of Contents
Nginx 프록시 로드발랜싱 환경설정
upstream noxwon {
	server was01; #dev01
	server was02; #noxwon
}

server {
    listen 80;
    server_name ian.hongsik.com;
    client_max_body_size 128M;
    access_log off;

    location / {
        proxy_pass http://noxwon;
	proxy_set_header    Host            $host;
        proxy_set_header    X-Real-IP       $remote_addr;
        proxy_set_header    X-Forwarded-for $remote_addr;
	proxy_connect_timeout 300;
    }
}
기본적인 간단한 라운드로빈 방식의 환경설정입니다. Nginx HTTP 로드발랜싱 문서를 확인하면 좀더 자세하고 다양한 옵션을 확인해 볼수 있습니다.
WAS01,WAS02는 내부서버가 아닌 외부IP를 사용하는것으로 가정하였습니다. 매칭은 DNS를 통해 할수도 있고, 프록시 서버의 hosts파일을 통해 얼리어스 할수도 있습니다. 전 얼리어스 방식을 택했습니다. /etc/hosts 파일에 was01,was02의 IP를 등록해두었습니다.
141.xxx.xxx.xxx was01
141.xxx.xxx.xxx was02
WAS01, WAS02 공통 환경설정
server {
        listen 80;
        server_name ian.hongsik.com;
        root /var/www/html;
        index index.html;
}
실습환경으로 간단하게 Vhost를 생성하여, 프록시 서버에서 was서버를 인식할수있도록 도메인을 설정해 두었습니다. 백엔드 서버를 내부가 아닌 외부를 바라보게 하였습니다.
프록시 서버 SSL 적용
ssl 인증서는 간단하게 Let’s Encrypt 를 적용하였습니다. 일주일에 5번만 발행할수 있으니 참고하시고, 무료이다보니 3개월마다 갱신하여야 합니다.
우분투 20.04기준으로 아래 명령어로 설치할수 있습니다.
apt-get install python3-certbot-nginx설치후에 certbot 명령어를 통해 인증서를 발행합니다.
certbot --nginx -d example.com -d www.example.com적용후에 아래와 같은 환경설정을 확인할수 있습니다.
upstream noxwon {
	server was01; #dev01
	server was02; #noxwon
}

server {
    listen 443 ssl http2;
    server_name ian.hongsik.com;
    client_max_body_size 128M;
    access_log off;

    location / {
        proxy_pass http://noxwon;
	proxy_set_header    Host            $host;
        proxy_set_header    X-Real-IP       $remote_addr;
        proxy_set_header    X-Forwarded-for $remote_addr;
	proxy_connect_timeout 300;
     }
# Certbot이 추가한 인증서
    ssl_certificate /etc/letsencrypt/live/ian.hongsik.com/fullchain.pem; # managed by Certbot
    ssl_certificate_key /etc/letsencrypt/live/ian.hongsik.com/privkey.pem; # managed by Certbot

}

server {
    if ($host = ian.hongsik.com) {
        return 301 https://$host$request_uri;
    } # managed by Certbot

    listen 80;
    server_name ian.hongsik.com;
    return 404; # managed by Certbot
}
실제 적용할때 위와 같은 설정이 아닐수 있습니다. 그러면 위와 같이 Certbot이 추가한 인증서 부분을 제외한 부분을 수정하시면 됩니다.
라운드 로빈 & SSL 적용 확인
Was01, Was02의 인덱스를 라운드 로빈방식으로 순환하는지 확인하기 위해 헤더부분의 텍스트만 수정해서 브라우저를 통해 눈으로 확인해 봅니다.
프록시 캐시 서버 적용
위 프록시 로드발랜싱은 작동확인을 위해 인덱스를 변형하였지만 실제 밀러링이나, 싱크중인 사이트일경우 동일한 데이터를 사용할것입니다. 이를 가정하여, 캐시를 적용해보겠습니다.
우선 nginx 환경설정화일에서 아래와 같이 캐시키를 추가하였습니다. 완성된 환경설정은 아래와 같습니다.
proxy_cache_path /var/run/proxy-cache levels=1:2 keys_zone=STATIC:10m inactive=24h max_size=1g;
proxy_cache_key "$scheme$request_method$host$request_uri$cookie_login";

upstream noxwon {
	server was01; #dev01
	server was02; #noxwon
}

server {
    listen 443 ssl http2;
    server_name ian.hongsik.com;
    client_max_body_size 128M;
    access_log off;

    location / {
        proxy_pass http://noxwon;
	proxy_set_header    Host            $host;
        proxy_set_header    X-Real-IP       $remote_addr;
        proxy_set_header    X-Forwarded-for $remote_addr;
	proxy_connect_timeout 300;

        #set cache
        proxy_buffering        on;
        proxy_cache            STATIC;
        proxy_cache_valid      200  1d;
        proxy_cache_revalidate on;
        proxy_cache_min_uses 3;
        proxy_cache_background_update on;
        proxy_cache_lock on;
        proxy_cache_use_stale  error timeout invalid_header updating http_500 http_502 http_503 http_504;
        add_header X-Proxy-Cache $upstream_cache_status;

}
    ssl_certificate /etc/letsencrypt/live/ian.hongsik.com/fullchain.pem; # managed by Certbot
    ssl_certificate_key /etc/letsencrypt/live/ian.hongsik.com/privkey.pem; # managed by Certbot

}

server {
    if ($host = ian.hongsik.com) {
        return 301 https://$host$request_uri;
    } # managed by Certbot

    listen 80;
    server_name ian.hongsik.com;
    return 404; # managed by Certbot
}
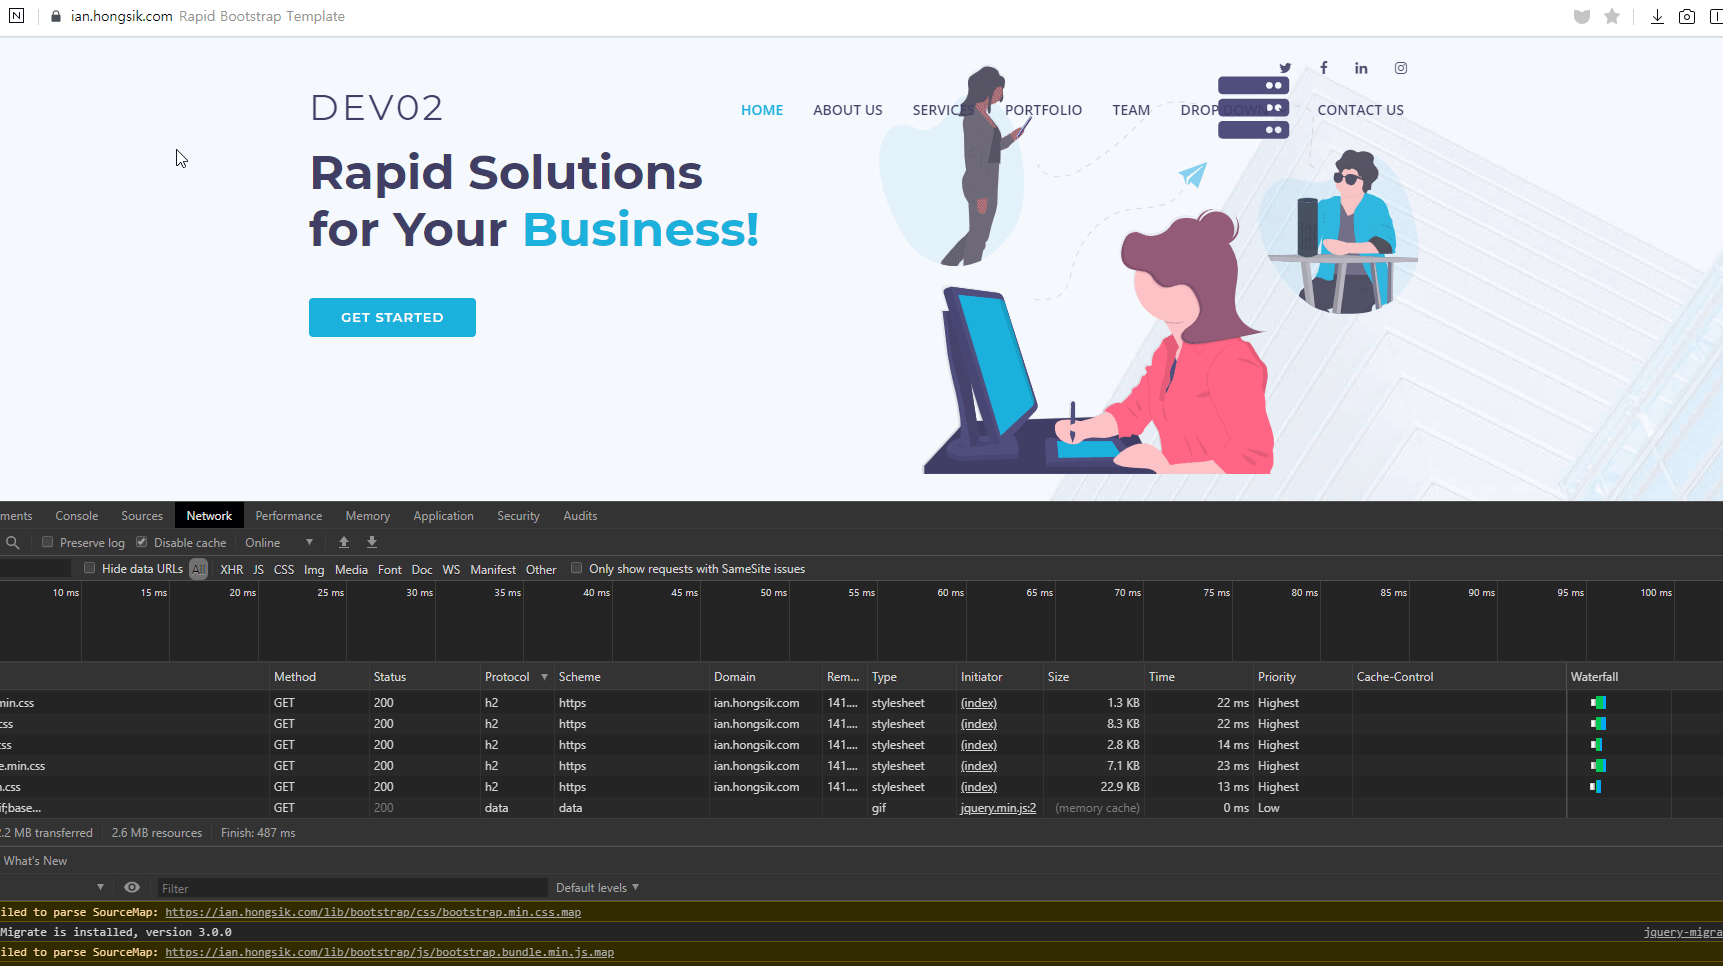
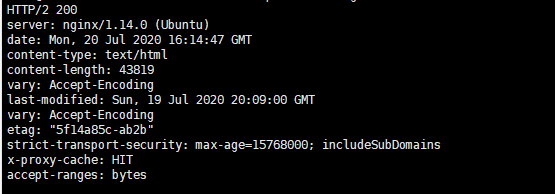
설정조정후에는 반드시 nginx -t 문법검사와 nginx -s reload 를 통해 환경설정을 다시 불러옵니다. curl -I https://yourdomain.com으로 확인해보면 캐시가 적용되었을시 아래와 같은 x-proxy-cache: HIT을 볼수가 있습니다.
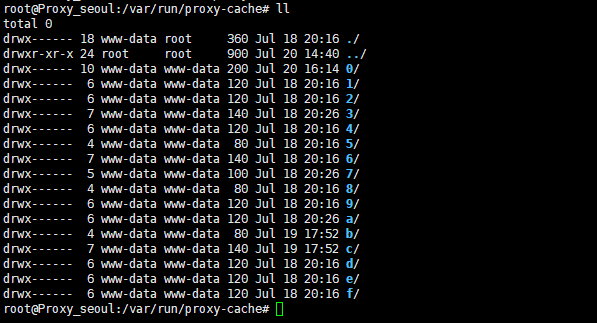
그리고 위에서 설정한 캐시패스폴더에서 캐시가 작동하면, 아래와 비슷한 폴더가 생성된것을 확인할수 있습니다.
마치며
개발환경에따라, 동적웹사이트의 경우는 위 실습환경의 구성은 적합하지 않습니다.
단지 구동뒤에 원하는 옵션을 조정하여 원하는 고가용성 서버구성을 하고자 할경우 먼저 환경을 갖춰 테스트하고 적용하면 좋을것 같습니다. 당연한 이야기만 하네요. 🙂